Wednesday, March 21, 2012

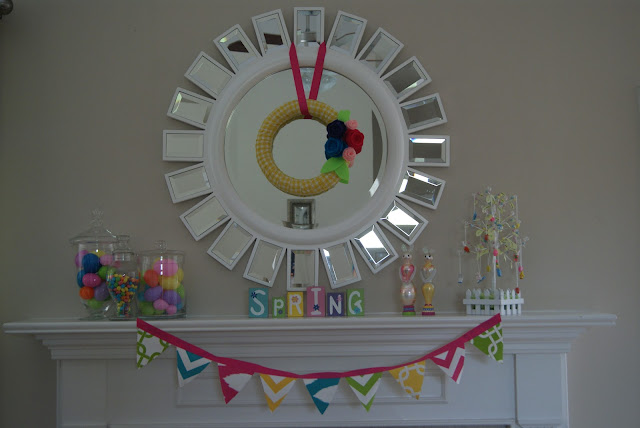
Easter Mantle!

Last week I shared with you my DIY Spring Wreath.  
I decided to hang it on the mirror above the fireplace and
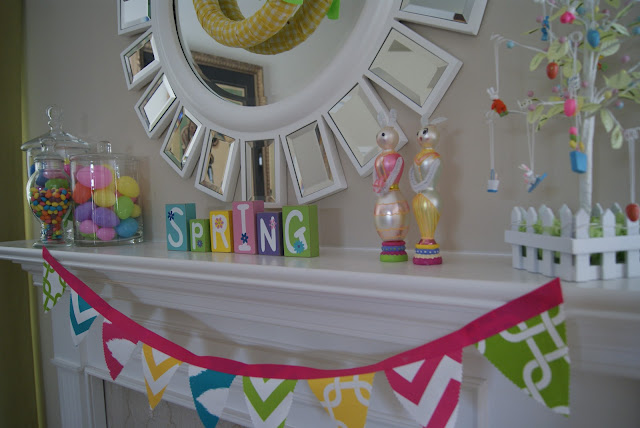
I tried to incorporate fun bright colors to coordinate with the wreath
and add in a little Easter fun!  


You can't go wrong with bright colored plastic eggs and jelly beans!


I've had this little tree with the tiny Easter ornaments for years.  The kids love it!
The glass bunnies were a gift from my mom.


The "Spring" wooden blocks were found in the Dollar Isle at Target!


I had some 5x5 fabric samples that I wasn't quite sure what to do with.  The colors
were perfect for the spring mantle, so I decided to make my own
colorful pennant!  I just cut them into triangles and attached 
them to the ribbon using an iron and Heat'n Bond.
Easy Peasy!


Bright, Cheerful, Colorful and Kid Approved! 


We're already enjoying 85 degree weather here in Nashville.  I think we
skipped right over Spring and headed straight into summer!  
(I'm not complaining though!  Bring on the heat!)

Friday, March 16, 2012

{DIY} Spring Wreath With Felt Flowers

I know that these types of wreaths are all over blogland and I'm a little
late to the party, but since I am such a 
beginner when it comes to anything crafty, I had to have a little fire 
under my tush to get me motivated and the Winter Pinterest Challenge that
Cassie over at Hi Sugarplum is hosting was the perfect solution!
Basically, the Challenge to actually make something that you have pinned on Pinterest.
"Stop Pinning and Start Doing" she says!  
I'm on board!   

I have to say, I'm quite smitten with my little wreath!  

I originally pinned this felt flower tutorial, because, frankly, I find 
felt flowers absolutely adorable and Danielle made it look so super
easy so I decided to give it a whirl!  

Here she is!  


Danielle used yarn to wrap her wreath but since I'm always strapped for
time and wrapping yarn around a wreath seemed like it would take for-evvva,
I decided to use fabric to cover my wreath instead.

Here is what I started with:
Fabric (found on Clearance at Joanne's)
Felt squares 
12 inch foam wreath (my pinspiration used a straw
wreath but I couldn't find one)


I cut the fabric into long strips and about 5 inches wide. I folded it in half so that I would not have 
any rough edges and just started wrapping.  It was about 10:30pm at 
night when I started this project and I realized that I was out of hot glue so I 
actually used straight pins to attach the fabric to the wreath.


Then, the fun part:  the flowers!

I followed Danielle's tutorial exactly (click on the link above
for her tutorial).  Here is what she did.

Cut a circle out of the felt...


Then, add a scalloped edge around the circle...


Start at any point on the circle and begin cutting into the circle in a spiral pattern...


until you end up with this...
(note:  leave that little circle in the very middle that you end up with as is.
Once you roll up the flower that will be the "base" that you use
to glue it all together)


You will end up with a looooong strip of felt.
(At this point, my mom who is my crafter-in-crime thought that I was crazy and 
had ruined a perfectly good piece of felt.  But, have faith my friends!)


Then, starting at the "tail" end, start rolling up your felt tightly adding glue in 
here and there along the way...


And here is what you end up with!  
My mom the skeptic was so impressed! 


I made a few more flowers using the same technique in assorted colors
and added in some green leaves.


And here is the finished project again!


Next week I will show you where this cutie is now living along with my
Spring/Easter mantle!  

I am also linking up this post over here:

Pop on over for some other DIY Pinterest Challenge ideas!!!  

Have a great weekend, loves!!!

Tuesday, March 13, 2012

Rock & Republic Jeans at Kohl's!

Did you all know that Kohl's is now exclusively selling Rock & Republic jeans???

I have always been a fan of their jeans although I have only ever ownd one pair and I was only
able to purchase that particular pair because they were maaaaaaajorly discounted due to a 
hole that I had to have repaired.  I think I only paid $25 for them which I thought was a steal 
since they retailed for about $160 and up.  

So, imagine my surprise when I heard that Kohl's was now carrying their jeans.  
Of course I had to go scope them out.

You know what?  They are adorable!  
I was pleasantly surprised.

I decided on this pair, the Berlin Skinny.


I'm a mom of three and in my 30's so I don't typically do a lot of skinny jeans, but these
really are perfect!  They are a little stretchy which is good because they are super
comfy and they also have a slimming effect.  As an added bonus they sit a little higher on the 
hip even though they are considered low-rise.  This is perfect for me because they
help to hold in my belly bulge (gross, I know, but it's true) and I won't show
my butt crack to other moms at the park.  They are skinny but not crazy 
skinny at the bottom, just skinny enough to look cool.  They are the 
perfect shade of blue with just enough distressing so that they can
 be dressed up or down (today I'm wearing them rolled up at the bottom with a tank and 
Chaco's for a picnic in the park, but they are equally cute with a 
dressy top and heels.  So versatile!)

And here's the very best part.  The price!!!  Right now they are retailing on sale
for $59.99!  The regular price says $80, but you know Kohl's, they always
have their items on sale.  Plus, you can always add in a coupon, 
that is always in their weekly circular, for an additional 
discount which is what I did.

Overall, I am SO happy with my purchase and I just wanted to share!

***This is just my opinion on these jeans.  I was not sponsored
by Kohl's for this post...but, hey, Kohl's, I'll take some more 
jeans if you want to send them my way!***

Friday, March 9, 2012

Family Room: A tiny sneak peek!

Happy Friday, y'all!

Well, I'm making progress on my family room!  
Yesterday my mom came over with her sewing machine in tow and we made SIX 
new bright and cheery pillows for the room!!!  She gets all of the credit for her mad sewing skills.
I was just her trusty assistant (however, after observing, I am very
curious about giving it a go myself!).  But, we did it!!!  I'm so proud of us!  Ha!

We had a few little snafus, but we just rolled with it and made the
best of it, and it all worked out in the end!  (Details on that later!)

I'm hoping to tackle a few more of the projects planned for this room
over the weekend, but for now I will give you
a sneak peek of one of the pillows that we made.

This one was made out of a kitchen towel that was on clearance for $2 at Target!
Ain't it cute!!!   


Y'all have an amazing weekend!!!!  

Wednesday, March 7, 2012

Keepin' It Real.

While I do believe I have made some major headway in my quest to 
organize my home with the closet, fridge and pantry re-do's, 
it seems that with every project I move one
step forward and eight steps back.  

I give you Exhibit A:


This is located in our master bedroom and it ain't
pretty to wake up to this site every morning.  
 It is supposed to be a sitting area
but we brought in the desk and it was going to be my
designated painting and craft area, my own little getaway.

I have yet to paint there and it's clear to see why!

This house lacks storage and closets.  So often, when I clean one room items 
get dispersed throughout the home to another room and eventually
we end up with piles like this.  

I have very limited time to work on these types of projects since the kiddos
are home with me on most days (they will be with
me every day next week due to spring break.  Lord help me.).

So, just keepin' it real for y'all today!  
Needless to say, I always have my work cut out
for me around here!  

(And please tell me I'm not the only one with areas like this!)
(And please don't submit this photo to the producers of Hoarders)

Monday, March 5, 2012

The Family Room Is Getting Some Love!


The main hub of our home is the bonus room/playroom.  Let's face it, it's mostly a playroom
as all of the kids toys are in there and it's where we spend the bulk of our time.  
But, it is also where the hubby and I end each day watching
TV and relaxing.  

Back in December I organized all of the toys with my massive shelving unit (you 
can read all about that process here) which has made a huge 
improvement by keeping all of the toys organized. 
But, the room just isn't flowing for me.  


Here is where the room doesn't make sense.  We have this 
very formal painting hanging above one of the couches.  I love this painting
but it doesn't really scream "playroom" does it?
What I would LOVE is a way to display the kid's artwork.
I have found the perfect solution at Ikea but sadly, the closest
store to me is in Atlanta which is a four hour drive.  I am thinking about DIYing my
own solution.  We'll see...


I found this subway art wall decal at Hobby Lobby (50% off).  I just love 
the "Family Rules" as I feel like I repeat everything 
that it says no less than 508 times a day...("play nice", "share your toys", "love one another").
I have a plan in my head to make the decal not look like a decal so 
I'll let you know how that turns out!


Here's the little trio watching cartoons.  To the right you can 
see the computer area.  It's still gated off...too much costly
equipment for them to destroy!  


There is not really anything wrong with these posters.  But, I can 
totally visualize a gallery wall full of family photos there.  
My goal is to make this the "family room", not just 
the bonus room or playroom.


We also need to rehang the curtains.  When the kids were much smaller they loved
to pull and tug on the curtains and eventually they pulled the 
hardware out from the wall.  They've been "dangling" there for months!


The room is working just fine, but I really want it to be fun, playful and colorful. 

Yesterday my mom and I went to Joann's and I found these really
fun and colorful fabrics.  Plus they are indoor/outdoor fabrics which would
be ideal and kid-proof.  


My mom has a sewing machine but she's fairly new at sewing.  In fact, I don't think 
she has EVER made a pillow.  But, we are going to 
wing it and attempt to recover my existing pillows with 
the new fun fabrics!  
Wish us luck!


So, here's the to-do list for this room:

Rehang curtains

Make new pillow covers with bright, fun fabric

DIY children artwork display?

Hang Gallery Wall of photos

"frame" subway art

What do you think?  Any suggestions for the room?
I'll keep you updated on the progress!

Friday, March 2, 2012

Refrigerator Organization!

Once again, in my quest to make my home more organized and effecient
I decided to organize the dreaded fridge!!!
I apologize for not taking any before pics.  The clean out all started 
because there was a funky smell in the kitchen and we could not figure out where it 
was coming from so I literally took everything out until I found the culprit.  
(left over Mexican from about two weeks ago.  Ewwww.)
But, you've seen my closet and my pantry, so you can just
use your imagination here.  Let me assure you,
it was in bad shape!

Our fridge has always been a mess with no place ever having a home of it's own. 
You just shove it in where ever there was room.  So, I knew that I wanted
to organize every inch of the fridge to make each shelf or bin make sense.

I found these adorable peel and stick chalkboard labels from the 
Martha Stewart collection at Staples.  (SO many cute things in her line!!!) 
I already had the chalk maker from Hobby Lobby.


Of course I threw out some outdated condiments and dressings and some uneaten leftovers.  After
I cleared out all of the food I cleaned and scrubbed all of the drawers, shelves and bins.
Then, I put everything back in and gave it all a permanent home.  


See below?  This is a perfect example of how an organized
fridge will be more efficient....FOUR containers of opened mayo!  Now that 
we can clearly see what we have hopefully this won't happen again and in the
end save us money. 


This little tiny shelf was like the black hole of the fridge.  You have to squat down to see
what is in there (that's where the leftover Mexican food was hiding!) so I purchased
these little bins at Wally World to house the kid's yogurts and juice boxes.
They fit perfectly!  No more black hole!


This little teal bin is from Target and will store the fresh veggies and the 
small bin is for snacks. 


(Why yes, that is a BOX of Chardonnay.  Keepin' it classy over here at the Moonpie House.)  
And my key to surviving triplets?  Coffee-mate creamer and Diet Coke. 
 And that box of Chardonnay.)

I found the little bin around the house (originally found in the Target dollar aisle) 
that is perfect for slice cheese.  

The meat drawer...


Ahh!  So refreshing!  
Now, the freezer, that's another story.
One project at a time!!!

Linked up at:

Related Posts Plugin for WordPress, Blogger...